Novice to Advanced Marketing System

NAMS | Building an Online Business to Support Your Dreams

  • Home
  • Product Catalog
  • Free Resources
  • Affiliates
  • Support
  • Blog
  • Masterminds
    • NAMS 90 Mastermind
    • Affiliate Sales Dominators Mastermind
    • Idea To Income Mastermind

Create a Graphic Banner with Photoshop

By David Perdew 4 Comments

How to Create Marketing Graphic Banners with Photoshop that Get Great Results!

We live in a graphic world.

SanFranciscoChronicleFireOne hundred years ago, people–who could–read. And they read a lot. Long books. Gray, type-heavy newspapers.

Even a spectacular news story like the 1906 San Francisco earthquake and fire that destroyed much of the old city was told in long lines of fine text.

To get the details of the story, one had to invest a little time and read the entire thing.

  • Bullets didn’t make it skim-able.
  • Sub-heads didn’t break up the text.
  • Color didn’t catch your eye.

Reporters learned to write with the most important information at the top of the story and the least important at the bottom. That way, when readers had enough, they could stop any time. Or if a story ran longer than the available space on the page, it could be cut from the bottom.

But over the years, newspapers, magazines and advertising evolved to communicate faster with fewer words, and more images.

People were busy. They didn’t have time to read like they did earlier.

We barely have time to tweet today.

“Just the facts, ma’am, just the facts.”

“Just the facts, ma’am, just the facts,” was Sgt. Friday’s favorite admonition on the old TV program, Dragnet, when a witness would go off on a tangent.

In my 17 years in the newspaper business, editors had to learn how to appreciate if not create graphics to pull out just the facts for the readers because they were reading less. The audience was becoming much more impatient.

Now, everyone is an editor and a publisher. If you have a blog, you must know how to create graphics to communicate the facts fast.

The rules still apply. Readers want to get the information quickly.

That’s why you need to know how to create images like the one below—a banner graphic used on social media, your blog, or in articles elsewhere.

SCTSalesBanner
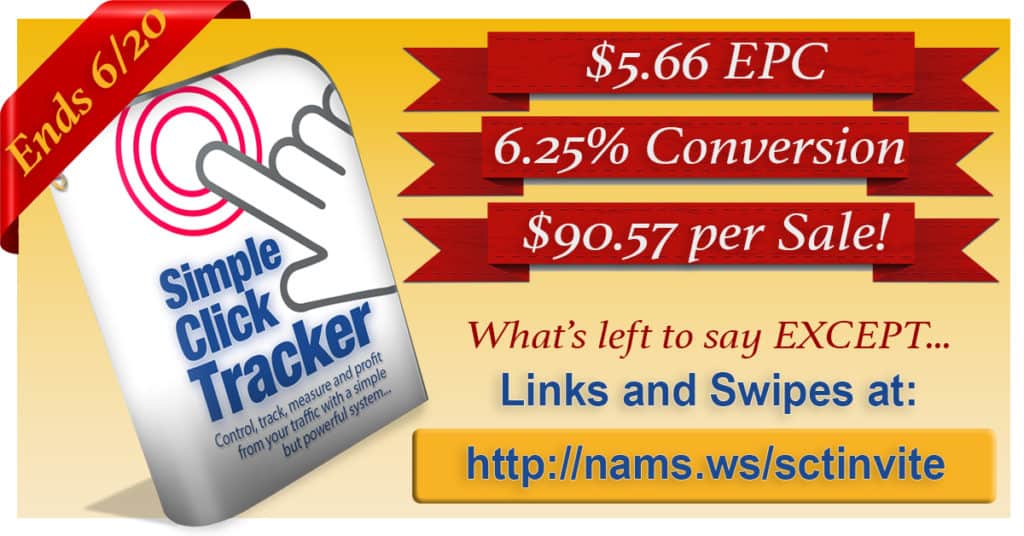
In this case, we needed to “announce” the results of our latest product launch to potential Joint Venture partners before the event was over so we could drive more sales.

The banner graphic had to fit the recommended newsfeed image size on Facebook—1200×628 pixels.

Thank goodness we now have Photoshop as an affordable, versatile and incredibly powerful tool to create graphics quickly.

But when you hear the word “Photoshop,” you might have a little bit of panic roll down your spine.

But don’t worry. It’s not nearly as tough days – or as expensive – as it was in the old days. In fact, it’s an incredibly versatile and powerful tool that you can get for less than $10 per month.

In today’s demo, I thought I’d show how I created a quick graphic in Photoshop that pulled in great results. I created this graphic below in less than 30 minutes. And I’m NO graphic designer!

What’s the goal of the graphic?

With only a couple of days left in the launch, we needed to increase the buzz about the Simple Click Tracker launch to convince JV partners to take another look at this promotion.

It was a higher ticket item for a JVZoo launch—between $47 and $147 depending on the license version.

So, the conversions on the front end were lower, but the Earnings Per Click (EPC), Conversions and Revenue per Sale were excellent.

So, our goals were simple:

  • Get the word out!
  • Focus on the numbers.
  • Make potential partners aware of the deadline.
  • Highlight the link to get the promotional tools.
  • Create more buzz.

The graphic I created had to communicate fast because it would be seen on Facebook mostly.

That’s a scrolling environment. No one is going to read much of anything. They are looking for something to catch their eyes.

If it works, people will see, be drawn to it, then act on it.

And it worked. On an 11-day launch, 36.4% of our sales came in the last day after we published this graphic

With results like that, you can see the importance of being able to create simple graphics that communicate your message extremely fast.

Nothing is better or more flexible at doing that than Photoshop.

Since it was first introduced on Feb. 19th, 1990, this software has gotten much easier to use, not harder. I should know. I’ve been using it since about 1995.

And in 1995, I probably paid about $1000 for the software. Today, you can get it for less than $10 per month if you subscribe annually.

So, let’s look at how I created that banner

First, I created a new canvas. Think of that as the background for my image. The size was consistent with the Facebook newsfeed—1200×628 pixels.

HowToPhotoshopBanner01

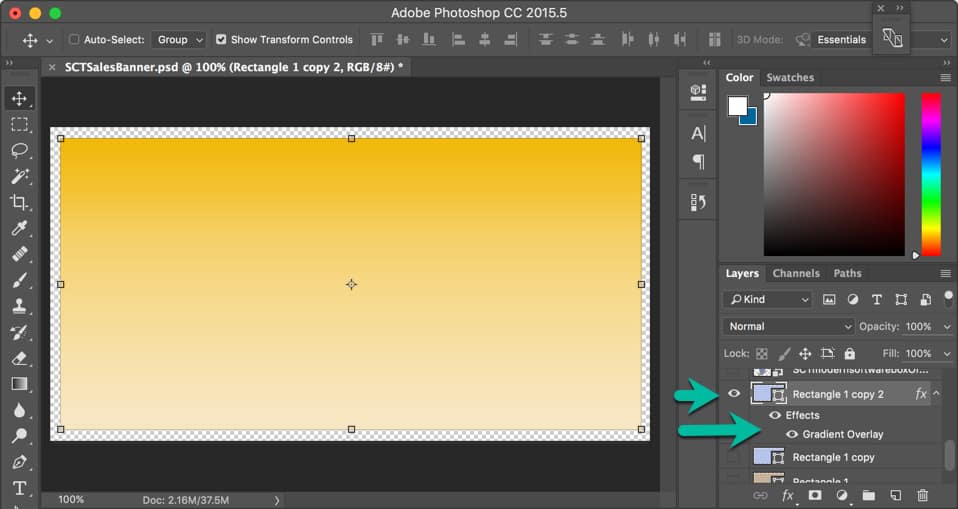
Next, I drew a rectangle using the shape tool.

An important note about Photoshop fundamentals…

Everything is based on layers. And once you understand the layers and how they are stacked in the project, called a .PSD file, you’ll love it.

You can arrange your workspace anyway you like by undocking many of the panels. I like to keep mine together and work in the canvas area—kind of an old school approach.

The layers are loaded in the right sidebar in the Layers panel.

Layers are stacked from top to bottom. The top layer will over the one below. Imagine that we had 5 layers in this order below:

  • 5
  • 4
  • 3
  • 2
  • 1

Layer 1 would be the background. And Layer 5 would be the viewable text on top. If you moved Layer 5 below Layer 1, the text would be behind the background and not visible.

A layer can be toggled on and off by clicking the eye icon. (See the green arrows.)

My first step was to create Layer 1 – the background. I added a rectangle just a bit smaller than the canvas area. You’ll see why at the end.

With this rectangle, I wanted a gradient background that would act as a not-too-subtle background, but also work with the type colors and other elements. So, I click on the fx button below and added the gradient overlay.

I won’t go into the specifics of how to do that because there’s other great training for that.

Next, I added my Simple Click Tracker software box graphic that I created in another simple program.

I dragged that image from my file explorer right on to the gradient background and gave it about a 15-degree spin by grabbing the image handles. With those same handles, I could resize the image.

HowToPhotoshopBanner02

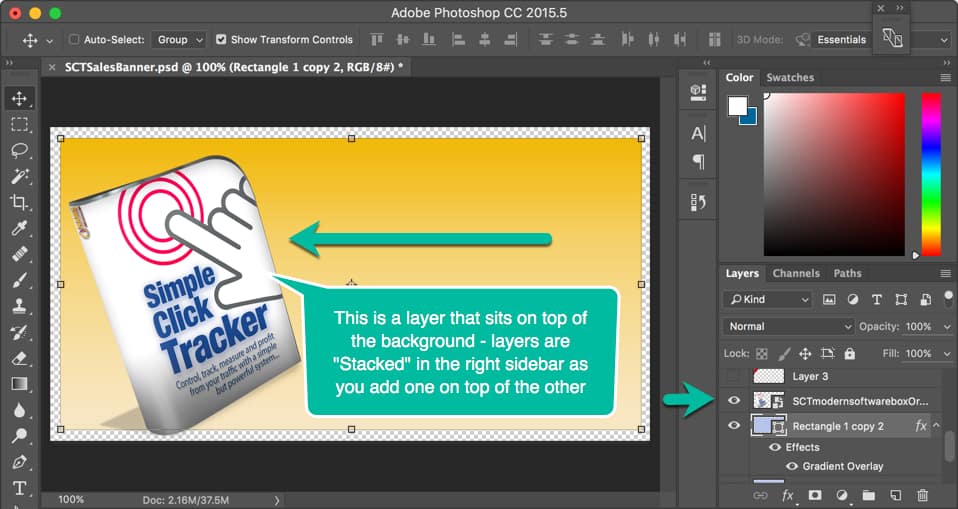
The software box image created another layer that sat on top of the background. Notice the layer in the right sidebar is above the background rectangle.

I had 3 great promotion numbers I wanted to highlight quickly, and I decided to do that by putting text over a red ribbon that “announced” the fact.

HowToPhotoshopBanner03
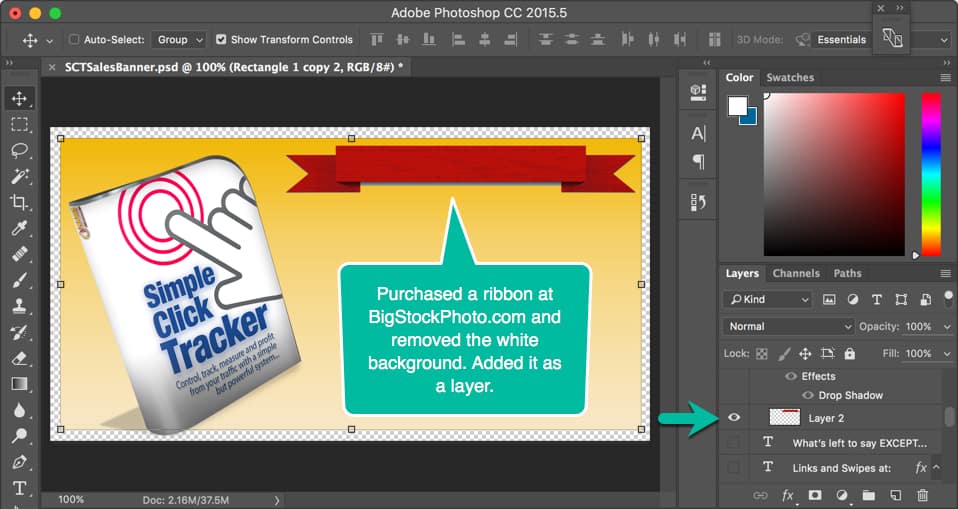
So, I purchased the correct ribbon from BigStockPhoto.com. (I usually buy 100 photo credits there a couple of times a year for about $175. An entire sheet of ribbons of varying sizes and shapes was 1 photo credit so it cost me about a $1.75.)

I drag the ribbon onto the image, grabbed the handles and resized it.

HowToPhotoshopBanner04

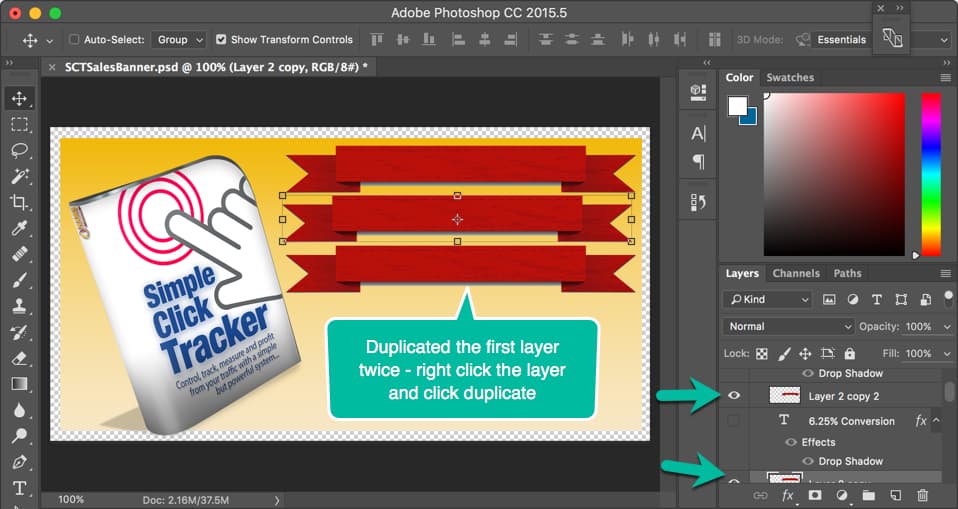
Once I had the ribbon positioned and sized as I wanted it, I right clicked the layer (in the Layers panel at right over the words “Layer 2”) and clicked “Duplicate Layer.”

It automatically created an additional layer with the ribbon in place.

I repeated that process since I had three ribbons, one for each number I wanted to highlight. See the image above.

HowToPhotoshopBanner05

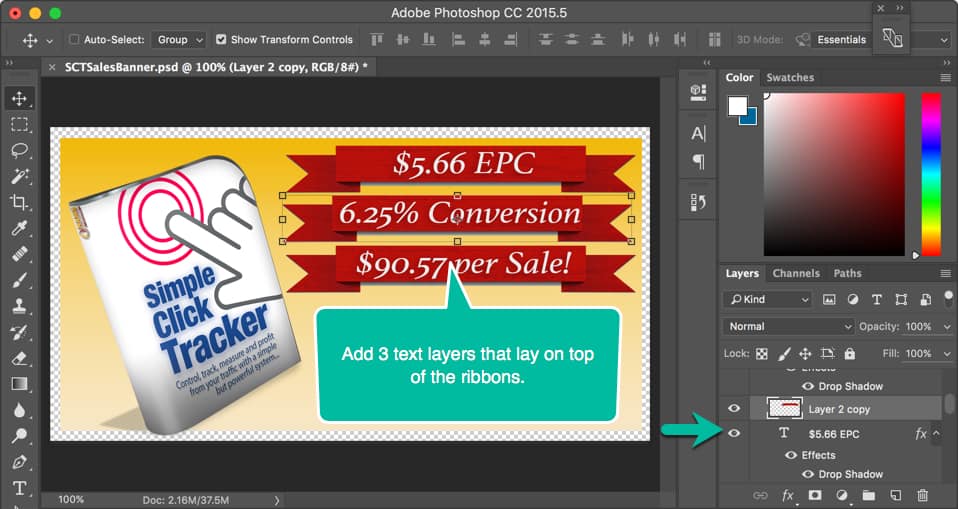
Next, it was time to add the text over the ribbons.

By choosing the text tool from the left tools menu icons (it’s the capital “T” in the left side at the bottom in the image below), I added the first text layer, chose the font, the size and the color.

I duplicated that layer twice and edited the text to add the next two number announcements. Then, I positioned them over the red ribbons.

As you can see, I’m just building up this image one layer at a time.

At first, that can seem a little confusing but once you get the hang of it, you’ll love the ability to turn layers on and off by toggling that “eye” icon in the Layers panel as well as organizing them by folders.

Below, I added a twist by creating a folder for the button because I knew that I could resize, move or edit the entire button at once if it were grouped in a single folder element.

HowToPhotoshopBanner06

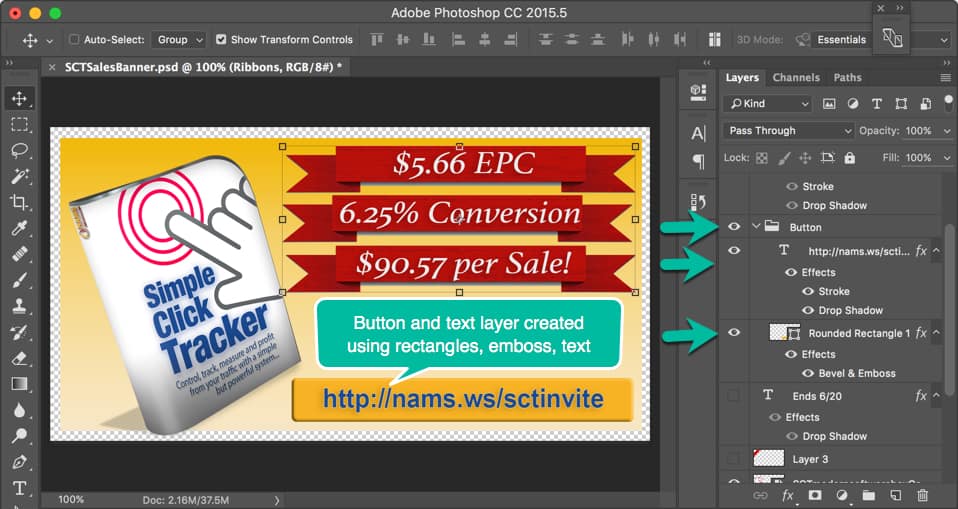
So, you’ll notice in the Layers panel, a folder icon at the first green arrow and the label Button. The “Button folder” contains two elements:

  • A rectangle that has been shaped using the emboss effect to look like a raised button, and
  • A text layer with a URL added as the text.

This gives the image the look and feel of a clickable link.

That’s good because I want them to click on the image to find the link in the caption. Facebook doesn’t allow clickable images, but you can include the link in the caption and it IS clickable.

HowToPhotoshopBanner07

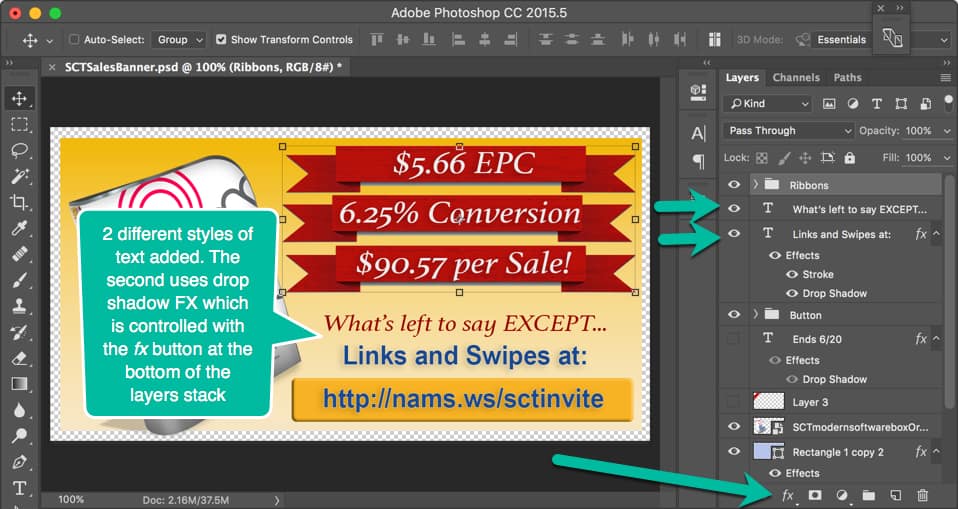
Next, I added two text layers with VERY succinct copy to drive viewers to go to the link in the button.

The text layers were styled using the fx options indicated by the bottom green arrow.

With one more photo purchase from BigStockPhoto.com, I grabbed another ribbon to highlight the corner and added the text layer over that with the ending date for the promotion.

HowToPhotoshopBanner08

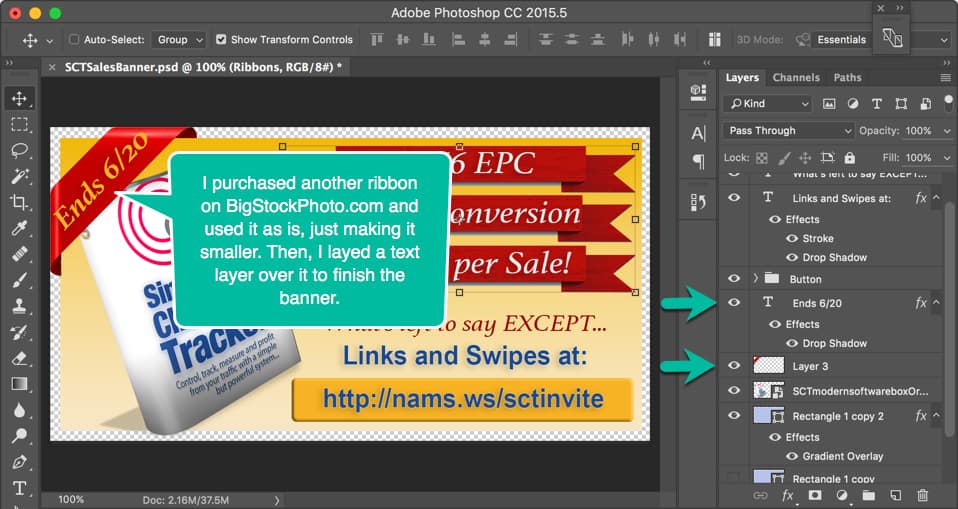
We associate corner ribbons with important announcements like “NEW,” “Version 2.0,” “Sale,” or other timely points. This is no different. I wanted the deadline to get special attention.

Notice how I made the illusion of the ribbon wrapping around the rectangle by making the background just a few pixels smaller than the canvas and adding the corner ribbon completely to the edge of the canvas.

Remember, I did that in the beginning because I had planned all along to have a corner ribbon “wrap” the banner.

The little curl-under effect was already on the corner ribbon when I purchased it, so I had to resize it to fit. When you get it aligned properly, it gives it that 3-dimensional illusion.

SCTSalesBanner

Once again, the finished image communicates exactly what I wanted it to say in as few words as possible with the right highlights.

Okay, I buzzed through this pretty quickly.

And yes, there are a lot of little things that you have to learn if you plan to use this incredible tool. I only learn enough to get done what I want to get done. By no means am I a Photoshop expert.

And you don’t have to be either. Once you learn the basics, you’ll zip around in Photoshop and you’ll never go back to your old—and more limited—graphics programs.

This demonstration uses some of my Photoshop skills specifically to show you how I combine graphics and marketing to get results. That’s the key. These skills were simple and easy to learn.

Don’t stop there.

If you want to get really friendly with Photoshop, check out Photoshop Friendly taught by Kelly McCausey and Samantha Angel.

Kelly & Sam are self-taught Photoshop users. They know well the features needed to create web graphics and what areas of Photoshop they’ve never needed to familiarize themselves with.  They have an incredible eye for design and a no-nonsense teaching style that you’re going to enjoy.

You’re not going to hear a lot of tech-speak. They’re not going to fly through demos at the speed of light, expecting you to just ‘catch up’. They’re breaking it down into chunks that you can refer back to.

Best reason yet, they’re giving you a chance to submit weekly project assignments for feedback and suggestions for improvement.  This is optional but I hope you decide to take advantage.

Click the button below to find out more about Photoshop Friendly training and the next class.

Coupon$30Off

Continue to Custom Content Wizard here

Click the button above to take a look at the Photoshop Friendly training and be sure to use the coupon NAMSPAY97 to get a great deal on the already underpriced live training from two REAL Experts!

Category: Featured Content

Discover How in Experience Based Workshop

By David Perdew Leave a Comment

Struggling? Need Just A Little Help? Or Simply Want To Improve Your Current Successful Business By Networking With Other Successful Business Owners?

From Novice to Advanced, The Nams Workshop Has Helped 100s Of People Move To The Next Level Of Their Business

Back in your school days, did you ever walk into a class that was just a little over your head? The words coming out of your instructor’s mouth seemed to be in another language – one you didn’t speak.

Fear races through your body because everyone else seemed to understand what the instructor was talking about, but for some reason you didn’t.

The fear turned into full-blown panic. Your skin got prickly and red. And your pupils actually dialated. No, your life wasn’t in danger.

But your pride was mortally wounded.

There’s nothing worse than feeling stupid, especially when there’s no reason for it.

Someone else carelessly put you in the wrong place at the wrong time.

Hey there. My name is David Perdew and I’m the CEO and founder of the NAMS workshop.

What I described above is the problem with most conferences and seminars today. Many tell you that they will teach you everything you need to know to build your business online.

But to put it bluntly - they’re lying to you. There’s no other way to say it. The goal at those seminars and conferences is to separate you from your money with pitchfest after pitchfest.

Here’s the truth. And you may not like it, I’m sorry.

No one can teach you everything you need to know in one sitting about building a business online.

When you were a freshman in high school, you learned everything you needed to become a sophomore. And as a sophomore, you learned everything you needed to know to become a junior.

If you went from junior high directly to senior classes, you were completely lost – and very miserable - unless you were a brainiac who skipped a bunch of classes – that wasn’t me, I guarantee you…

You didn’t learn everything you needed to know in just one class, not even one year. It took 4 years: freshman, sophomore, junior and senior. And if you did what you were supposed to, you graduated.

But you NEVER stopped learning.

That’s why we do things differently at the NAMS Workshop.

We don’t tell you big stories that lead to disappointment. With more than 60 percent of our attendees returning to each workshop, we make sure you move through the learning tracks to get where you need to be as fast as you can.

And we support you all the way.

What we do is called experience-based training. With four learning tracks, we make it simple to figure out where you need to start. For example:

  • In NAMS100 - You probably don't have a website yet and are making no money, but really interested in learning howItem
  • In NAMS200 – You probably have a website, but making very few sales and when you do, you don’t have a clue wh
  • NAMS300 may be for you if – You have one or more sites that are making enough money to contribute to the family income. You may be making the house payment or the car payment or maybe even paying for your family vacations. That’s good, because you need a vacation! You’re working your tail off and need relief in this track
  • strong>And the elusive NAMS400 track – You’re a full-time business person driving a lot of revenue online. In fact, money is not the issue right now for you. You’re in the top 2 percent of online business people who actually won the brass ring. But your problems aren’t gone, they’re just more complicated requiring more finesse. Networking with other people who have similar issues and can relate to your business needs while building real assets – that’s your concern.

This is how we designed the NAMS workshop. And it’s working.

We have hundreds of raving fans.

The community is real, supportive and even giving. Everyone - Students, Instructors, and Aides - helps everyone else.

If you want to start or improve your business online at any level, the NAMS workshop is for you.

But don’t take my word for it. Let me prove it to you.

Input your first name and e-mail address in the box above and we’ll send you the proof.

Category: Featured Content

By David Perdew Leave a Comment

"Create Profitable And Powerful Information Portals Using Your FREE MyNAMS Niche VRE Packs… Set them Up Once, Customize, Automate and Ka-ching!"

Those Niche VRE and Turnkey Sites Packs That Come With Your MyNAMS Membership Month After Month Were Meant To Make You Money… But Only If You Set Them Up Correctly Into Profit Pulling Virtual Real Estates That Work For You Day In and Day Out.

Alright. You've signed up for the MyNAMS lifetime or monthly membership and by now are enjoying tons of benefits like…

  • using the PLR materials for your blog, website, reports, ebooks, give-aways, and other products;nichesitecustomization
  • creating videos using the royalty-free music as background;
  • incorporating the graphics to your blog;
  • generating sales from ebooks at the niche mall;
  • applying your learning from the regular weekly webinars and replays you get lifetime access to;
  • getting great advice from your interaction with the MyNAMS community at the site and Facebook groups.

Hold on a sec.

How about those Niche VRE and turnkey sites packs you get free each month? What ever happened to those?

  • "Nothing."
  • "I have no idea what to do with them."
  • "They're pretty complicated to set up."
  • "How do you install them?"
  • "They don't look appealing."
  • "They're taking up too much of space in my hard drive."
  • "Haven't given a thought."

Oopsie…

Listen up.

If you haven't used any of these plain-looking "ugly" creatures you're leaving tons of money on the table!

What if we show you what to do with them?

  • From setting up to automation
  • Step- by- step Instruction
  • All questions answered in layman's terms
  • With all the guidance you need in all formats
  • Plus a bonus!

… so that you can make passive income ASAP? You know… one that you set up once and make money many times over.

Well, that's exactly what we've done for you!

Introducing… The Niche Site Automation MicroWorkshop

In this 6-hour virtual workshop, David Perdew, the mastermind and CEO of MyNAMS, show you all there is to learn about setting up, customizing and automating your niche VRE sites.

Using a mindmap to visually capture important points and their interrelationships, David shows you everything you need to do.

Here's what you will accomplish in this workshop:

  • Clarify your own vision and long-term strategy for niche sites you want to set up: What is it you really want and envision?
  • Learn various ways that you can make use or maximize these niche VRE and turnkey sites
  • Realize the value of creating an information portal as a long term strategy to attract more and more people to click through and come into your main money site
  • Discover simple, moderate and extreme steps to set up your niche sites into an information portal
hubandspoke
  • Find multiple ways to monetize your site and keep track of results
  • Discover how to customize your niche site to make it appealing to your readers
  • Find out about handy tools that will make life easier for you most especially if you don't know a thing about coding
  • Find out how to organize resources prior to actual setting up to make things easy
  • Get clarified on how to deal with duplicate content
  • Discover ways to automate changes in the set up
  • And tons more!!!

You set up your niche site or information portal once following David's comprehensive guide.

Rinse and repeat.

Once perfected, daunting technical tasks would soon mute into simple normal activities you could do over and over.

All because David presents them in a methodical, organized and simplified way that's easy to grasp and model.

Like any kind of work, you have to roll up your sleeves and get dirty.

There's a learning curve to this, that's for sure.

BUT don't worry… You'll catch up in no time.

Besides, everything is recorded.


By investing in this 4-hour micro workshop, you
immediately get access to the following:


Video/MP4 Access:

Niche Automation and Customization Part 1
Niche Automation and Customization Part 2
Niche Automation and Customization Part 3

Audio/MP3 Downloads:

Niche Automation and Customization Audio Part 1
Niche Automation and Customization Audio Part 2
Niche Automation and Customization Audio Part 3

Resources:

The Freemind Software
Mindmap for Freemind software
HTML Link to Online Mindmap with active resource links
Mindmap as PDF Checklist
Free Niche Pack Download ( zip file)


This Workshop doesn’t cost a fortune either!

$97


What are you waiting for? Act now!

add-to-cart

Coupon Code is embedded in the link

If what's holding you from having an added passive income stream is your lack of knowledge or know-how on how to get MyNAMS' free niche VRE sites to work for you…

You have no problem at all.

Niche Site Automation MicroWorkshop is just what you need.

But unless you act now, you must live with the fact that you will continue to save unused, unzipped MyNAMS Niche VRE and Turnkey Sites!

Month after month.

Oh, by the way. If you're not a member of MyNAMS yet, it's never too late to jump on in. You're always welcome.

There’s nothing to fear. All risks are on us.

We are so sure you’ll love the Niche Site Customization and Automation Workshop that we offer you our 30-day no questions asked money-back guarantee.

money-back-logo
IRON-CLAD, BULLETPROOF GUARANTEE

How Can We Offer A 100% No-Questions Asked, Money-Back Guarantee?

You've made a great decision! Now, it's time for us to live up to our end of the bargain. And we always do, no matter what the issue is.

Our reputation is the most important thing we have at NAMS. We've helped hundreds of students create new businesses or improve existing ones.

Still, we want to make this even easier for you!

Our fool-proof guarantee says that you will have 30 days to decide whether this is for you.

And frankly, it's not right for everyone. Only those who are serious about taking control of their lives and their businesses need apply! But if that's you, jump and we'll assume all the risk. If you change your mind for any reason within 30 days of purchase, we'll happily refund your money.

You have nothing to lose! There's no risk to you. Try it and love it. If not, you can get your money back easily, quickly and safely with our fool-proof guarantee!

David Perdew
NAMS CEO

$97


What are you waiting for? Act now!

Don't find yourself yourself in the same spot next week, next month, next year.
Still thinking and wishing…

add-to-cart

Coupon Code is embedded in the link

Act now and see great possibilities unfolding.

https://mynams.com/featured/26412

Category: Featured Content

200 Original Royalty Free Extended License Photos Pack 3

By David Perdew Leave a Comment

Did You Know That With One Little Mistake, You Could End Up Paying The Stock Photography Agencies Thousands Of Dollars In Penalties?

People are getting nailed by the stock photo houses each day for high dollars
because they didn't download images for EACH use?

Now, you can begin building your extended license image library and avoid the hassle
with this collection of 200 original images in the MyNAMS first
Royalty Free Extended License Photo Collection!


Over the last 35 years, I've sold pictures to National Geographic, Sports Illustrated, Time, Newsweek, People, Travel & Leisure, Parenting, dozens of newspapers and several textbook companies. And I owned - and sold - a successful stock photography agency with 300,000 images.

But I've never created Royalty Free Collections. Until now...

With between 20 and 30 thousand images from my 35 years of travel and professional photography work, I have never let my babies go as Royalty Free images.

That changes today with my first set of RF images.

And I'm throwing in the Extended License as well.

Why is that important?David Perdew Royalty Free Images Set 1

Every time you use an image from one of the big stock photography agencies, you must make sure you've paid an additional license to use it again. You're paying to use it one time in one project. That's it. If you use it again without paying again, you're setting yourself up for a huge fine from the stock photo houses.

It's called copyright violation, and it's a good thing. Copyright protects us all. But the hassle is not so good. That's why I'm selling these with an extended license. You only pay once and you can use them for your projects as many times as you want. An extended license removes that worry. You can use images with extended licenses over and over without penalty.

What's in this collection?

You'll find 200 images in 13 categories suitable for using in many different ways. Watch the short video above to get an idea of the images contained in this first set.

Every picture in the collection is shown in the 3 minute video above.

Categories are:

  • Animals
  • Christmas
  • Fireworks
  • Flags: American
  • Industry
  • Kids
  • People
  • Studio Concepts
  • Travel: Africa
  • Travel: Beach
  • Travel: Cades' Cove
  • Travel: China
  • Travel: England

So, extended licenses on images must be really expensive, right? At the stock photo houses, yes! You could pay (and I used to charge) $1000s of dollars for the right image use license.

I'm creating 6 collections over the next couple of months. And each collection is $97 for 200 images. That's incredibly inexpensive for quality imagery.

But YOU won't pay anything near the normal price!

Because this is an introductory offer, you get a huge $60 discount.

$37

You'll have to click the add to cart button to see the coupon embedded in the cart.

Once you click through, the price will change automatically with the discount before you confirm your purchase.

But don't hesitate! The price is going up.

The button below is for your personal use of all the images in this pack without restriction.

Click the button below to start your MyNAMS Royalty Free Image collection with Extended Licenses!

Buy Button

Maybe you'd prefer the opportunity to sell these images yourself?

For the first time ever, we're offering Master Resale Rights to this collection. In other words, you can sell these images to your customers WITH Resale Rights, so they can sell them to their customers with personal use rights only.

That is a sweet deal!

These are all high-quality, original images. And you can begin selling them today. Get Master Resale Rights for just...

$77

Click the button below to start your MyNAMS Royalty Free Image collection
with Master Resale Rights!

Buy Button

And of course, as with everything else we sell, you have 30 days to try it. See our guarantee below.

money-back-logo
IRON-CLAD, BULLETPROOF GUARANTEE

How Can We Offer A 100% No-Questions Asked, Money-Back Guarantee?

You've made a great decision! Now, it's time for us to live up to our end of the bargain. And we always do, no matter what the issue is.

Our reputation is the most important thing we have at NAMS. We've helped hundreds of students create new businesses or improve existing ones.

Still, we want to make this even easier for you!

Our fool-proof guarantee says that you will have 30 days to decide whether this is for you.

And frankly, it's not right for everyone. Only those who are serious about taking control of their lives and their businesses need apply! But if that's you, jump and we'll assume all the risk. If you change your mind for any reason within 30 days of purchase, we'll happily refund your money.

You have nothing to lose! There's no risk to you. Try it and love it. If not, you can get your money back easily, quickly and safely with our fool-proof guarantee!

David Perdew
NAMS CEO

Image Specs:

All images are at least 96 pixels and 1600 px on their longest side.

No image is model released unless indicated.

Category: Featured Content

SOMS Access

By David Perdew Leave a Comment

Category: Featured Content

  • Previous
  • 1
  • …
  • 15
  • 16
  • 17
  • 18
  • 19
  • …
  • 59
  • Next
  • Help Desk
  • Contact
  • Support
  • Privacy Policy
  • Earnings Disclaimer
  • Legal Notices
  • Membership Agreement
  • TOS
  • Testimonials
  • Affiliate Disclosure

Copyright © 2025 · MyNAMS.com · All rights reserved
NAMS, Inc. 203 CR 890, Etowah, TN 37331 USA

Disclosure: Some links on this website may be affiliate links. If you make a purchase through one of our affiliate links, we may earn a commission.
We only endorse products and services we use or trust.